Introduction to Resizing a Website Image
Using photo images in website design is a common practice. Images help set the tone of a website, facilitate an emotional connection and help create an impression. Photos are also used to draw attention, often to a branding message or call-to-action (CTA).
Photos and graphics can be placed anywhere on a website page often to create a context for the copy associated with the image or help with brand positioning.
Before you add a photo to a website page, there are a few things to consider:
• Does the photo fit the space (is it square, rectangular, panoramic, etc?)
• Will you use the whole photo or only a portion of it
• Will the photo work well on different size screens
• File size and image resolution
When you use images on a website page, optimize them for file size and dimension so it will fit onto the page where you want it, while not slowing the load time of the page.
File Size
File size refers to the amount of memory a photo or image consumes ranging from kilobytes to several megabytes.
The file size for use on a website should be under 170 kb.
A small file size helps:
• The image load faster (a search engine ranking factor)
• Saves resources and space in the website’s database, where the photos are stored
File Compression
File compression reduces file size and optimizes storage space. It encodes information using fewer bits while retaining essential data and minimizing quality loss. In website design and development, file compression is important for faster loading times and improved user experience. Images in particular can occupy a significant amount of space on a website. Image Compression can make images smaller without sacrificing the final product’s visual quality. JPEG, PNG, and WebP are often used formats for photo compression.
Specifically, one image compression method that is used is lossy. This compression technology selectively discards certain image data that is less noticeable or less important to the human eye. This includes removing high-frequency details to reduce the number of colors or levels of intensity.
Lossy compression has been developed for various file formats, with the most commonly associated formats being JPEG (Joint Photographic Experts Group) and GIF (Graphics Interchange Format). However, it should be noted that lossy compression is not limited to images. It can also be applied to audio and video files to reduce their size. lossy compression is better suited for JPEG files as it can reduce file size while maintaining acceptable visual quality. WordPress automatically applies compression to JPEG images, but you can modify the level of compression through coding, which means editing the functions.php file.You can further optimize your files using image-editing software or WordPress image optimization plugins.
Lossless compression is recommended for PNG files to maintain their original quality. Lossless compression is best for text-heavy images and pictures with transparent backgrounds. It retains image quality while reducing file size. Lossless compression is also a good option for websites that rely heavily on visual content. Sites like an Art Gallery or photography site would utilize lossless compression. Other methods, such as using a Content Delivery Network, can also improve site performance without the need of lossless compression.
There is a difference between lossy and lossless. Lossy reduces the quality of the final product while removing some of the original image’s data. Lossless compression keeps every bit of the original image’s data, Lossless image quality is higher which makes file size is larger. Lossy compression is typically better suited for complex images with lots of colors, features, and gradients, such as photographs, graphics, and other visual media. Lossless compression is more appropriate for plain photographs with few colors, obvious edges, and text.
In conclusion, regulating file sizes and maximizing storage capacity require the use of file compression. Its importance is particularly evident in website design and development, where it helps to improve user experience by enabling quicker loading speeds. The space that photos take up on a website can be greatly reduced through image compression, and popular formats like JPEG, PNG, and WebP are excellent for this. Website administrators can strike a balance between ideal file sizes and keeping the visual quality required to properly engage visitors by employing appropriate compression solutions.
Image File Types
For a website, you can import and display images using JPG, GIF and PNG file types.
• JPG files are the preferred file format for photos and images to be loaded onto the page.
• PNG files are the preferred file type for logos or photos when the background of the image needs to be transparent.
• GIF files enable animation
Image Shape
Image shape refers to the x-y dimension of a photo or image, measured in pixels.
Pixel is the smallest unit of measure used to define the size of a dot of the image on a screen. Pixel has its origins originally used to describe printing quality, where 300 dots per inch (DPI) on a printing press was high resolution printing. Digitally, a high-resolution image will have about 300 pixels (dots) per inch.
When we size a photo for the website, we are specifying its x-y dimension in pixels. Images sized 300×300 pixels would be square, 2000x 500 would be a wide format rectangle, and so on.
When sizing a photo, sometimes it is an option to maintain its aspect ratio. For example, 2000×500 pixels is the same shape (aspect ratio) as 1000×250 pixels, but will appear on the website page as half the width and height.
Choose a photo that fits the shape of the space you are trying to add to the photo. For example, if the photo is to be full width you want to select a panoramic image. If it is to be square, then choose a square photo or crop a rectangular photo to make it square.
To not to lose resolution, you do not want to take a photo and try to make it larger than it was originally. Doing so will make it appear grainy (pixilated)
Where can I find Stock Photos?
Some popular stock photo databases with millions of photos to choose from include:
www.stock.adobe.com
www.shuttershock.com
www.istockphoto.com
www.unsplash.com
For free stock photo options, check out:
www.pexels.com
www.pixabay.com
If you are looking for high-quality images, check out:
www.gettyimages.com.
Why Size Matters
The most necessary aspects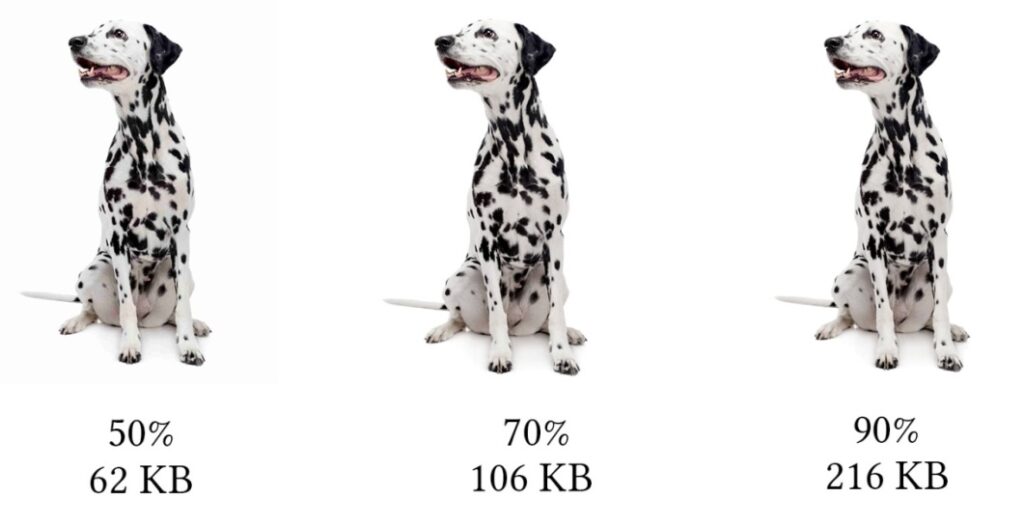
of uploading pictures to WordPress
or any social media platform
is to contemplate the dimensions
of every image file.
Images with very large file sizes can slow down your website, and make images look misplaced and blurry. This can negatively affect your online brand image and cause users to leave your site.
The reduction of quality is one way of reducing the file size of an image. Referring to the graphic above, the percentage shows image quality and the number below the percentage shows the size of the file. Notice that there is hardly a difference between the three images. The images are all in the same dimensions.
Here are some common image dimensions used on websites:
• Header image size (banner size 1048×250 pixels)
• Featured image size (landscape 1200×900 pixels)
• Featured image size (portrait 900×1200 pixels)
• WordPress background image size (1920×1080 pixels)
• Logo image size (200×100 pixels)
• Thumbnail image size (150×150 pixels)
• Blog post image size (1200×630 pixels)
Click Here for Canva Tutorial Click Here for Pixlr Tutorial Click Here for MS Paint Tutorial